A said... on Another Lauren Hairstyle
well, I am in many different sports, all I usually wear is a pony tail but I'm always looking for new ways to wear my hair, and I am in love with make it or break it, I've tried mocking her hair but it just doesn't work out! I am going to try this! does your hair have to be really long though?
No your hair doesn't have to be long to do Lauren's Styles. In my opinion that is the best thing about her styles is you can do any length of hair because of the tight braids and rolls.
Hairstyles pictures of long hairstyles, medium length hairstyles and short hairstyles, prom hairstyles, wedding hairstyles and hair updos with best hairstyles pictures of curly, wavy and straight hair
Tuesday, July 27, 2010
Monday, July 26, 2010
Make it or Break it Lauren Hair Version 2
I apologize for the lack of and quality of these pictures but we did this style while we were camping.
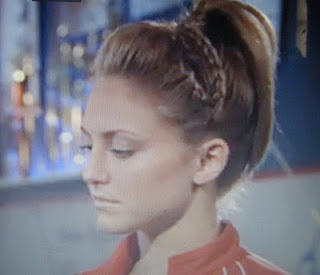
Since it was difficult to tell exactly how Lauren's hair was done during this episode this is our version #2.
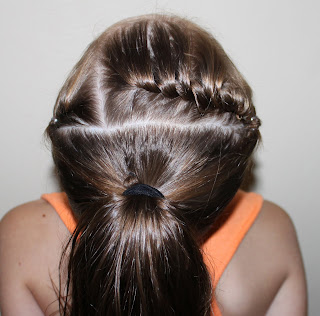
Make the center poof as before. Then french braid along the face line as the post before. The difference with version 2 is that I continued the french braid back up toward the high ponytail. If I was to do this again I would french braid a little bit further so you can't see all the elastics.
The french braid is shown below.
Below is the poof and both french braids before I put them into the ponytail.
Cute Girls Hairstyles - French Braid #1
I don't have anyone who can do videos for me while I style hair. So I have been in contact with the wonderful women from Adopt a Do Hairstyles. She has a video already put together on how to do a french braid.
Cute Girls Hairstyles - Waterfall French Braid
Once again the wonderful woman from Adopt a Do has allowed me to post what we call the Princess braid they call the Waterfall french Braid. Check out her website for really cute hairstyles as well.
Make it or Break it Toddler Hair
I just received a post from Hair for the Mini Diva who also did Lauren's Hairstyle from Make it or Break it I wanted to share it for those who have toddlers. My toddlers hair is too thin for this style.
Here is the link http://tinydiva.blogspot.com/2010/07/more-lauren-mibi-hair-for-short-hair.html
Here is the link http://tinydiva.blogspot.com/2010/07/more-lauren-mibi-hair-for-short-hair.html
Wednesday, July 21, 2010
Make it or Break it Version 1 Lauren's Braids
This style was taken from Make it or Break last weeks episode. This is one version we are going to do another version very similar.
Start by making a front poof.
Then make a part parallel to her face. This is where your braid will be. Part shown below.
French braid from the poof down towards her ear braid all the way to the end of her hair as shown below.
Do the exact same down the other side.
Next take all her hair and pull it into a high ponytail. Once the ponytail is in place take the braids and pull them up and secure with an elastic. I took the remaining hair and wrapped it around they ponytail elastic.
The other side below.
Thursday, July 15, 2010
Rockin Bobbie Pins Fancy Uphair
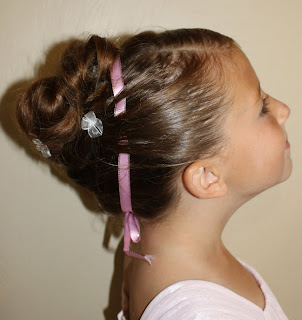
This is a fancy up style that we did for church.
Make a far lateral part and pull it towards her ear. Secure with an elastic. As shown below leave a small amount of hair out of the elastic along the face line.
On the opposite side make a part down to the ear and pull that hair forward out of the way as shown below. Then put a ribbon along the part line. Tie the ribbon together at the base if her head.
Make a part from ear to ear and pull it out of the way.
Now take the hair you left out of the elastic and the hair in front of the ribbon and pull it to the center of her head and secure with an elastic.
Below is a side view of the hair over the ribbon. I pull both sides back into this elastic to keep the ribbon in place. If your daughter has fine hair then when pulling this hair back make a twist over the ribbon and if all else fells use a small bobby pin under the twist and over the ribbon. This also helps keep the ribbon in place.
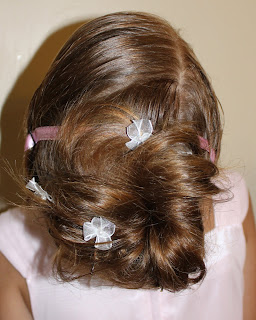
Make a messy bun with all the hair.
I made some fancy Rockin Bobbie Pins and pushed them into the messy bun.
Labels:
bun,
ribbons,
Rockin Bobbie Pins
Wednesday, July 14, 2010
Sponge Curler Picture
A has left a new comment on your post "Sponge Curlers":
what kind of sponge curlers do u use? what brand? what are they called?
I have posted a picture of the ones I use for my oldest daughter. They are Conair brand, they are also called foam rollers.
what kind of sponge curlers do u use? what brand? what are they called?
I have posted a picture of the ones I use for my oldest daughter. They are Conair brand, they are also called foam rollers.
Labels:
Questions
Monday, July 5, 2010
4th of July Girl Style
Once again I apologize for not getting these posted before the holiday. This one would be cute without the 4th of July accessories. The ideas for the hair accessories came from my favorite mom site. The link is http://www.mom-stuff.com/public/301.cfm
The reason I included the picture below is because the part is very important for the braids to lay right.
The first part is from ear to ear then pull the back hair into a ponytail out of the way.
Then make a diagonal part as shown below.
Start with the part on the right side (looking at the picture above) The reason for this is the left side is going to overlap the right braid. French braid from her ear to the center of the part as shown below.
Next french braid the left side all the way up to the center part. This braid overlaps the first braid.
Below attach the braids together with an elastic.
Then we added the fun 4th of July accessories we made. http://www.mom-stuff.com/public/301.cfm
The picture below shows all the accessories we made to match. Her hair accessories, her belt and also her flip flops were taken from http://www.mom-stuff.com/public/301.cfm
4th of July Fun Toddler
I apologize I didn't get these posted before the 4th of July. Things have been crazy for us this summer. You can use these for other Holidays such as the 24th if you live in a state that celebrates.
I didn't do anything really fancy with her hair it was all about the accessories with her.
I made a zig zag part and then put her hair into pigtails The hair accessories were secured with the fun sidewinders http://www.hairholders.com/ The sidewinders made the accessories stand up. I was going for the fire work affect with her hair.
We got the instructions for the hair accessories from http://www.mom-stuff.com/public/301.cfm.
My daughter got so many compliments. Also the flip flops and belt she is wearing came from the same website. We are going to try them in different colors because they were so cute.
Thursday, July 1, 2010
Make it or Break it Hair Lauren's Rolls
We are so excited that Make it or Break it is back on. One because my daughter loves to watch it and two I love Lauren's hairstyles. She is not very nice, but they always have her hair done really cute. So after Monday's episode here is our version of her hair.
Below is the top of our finished hairstyle

Below I posted a picture of how I made the first parts. A far lateral part and then one along the ear lines. I pulled the rest of the hair into a ponytail to keep it out of my way.
Then I started making a roll along the back part line. This is similar to braiding but you use 2 strands. You only pick up from the front as shown below. Continue rolling all the way to the ear, then secure with an elastic. Do this to both sides
Below shows the roll farther along so you can see how to make the roll.

Then pull all the hair into a ponytail.
I did this while her hair was wet so when the ponytail drys then put some ringlets in.
Subscribe to:
Comments (Atom)


